Showing posts with label cruffle. Show all posts

Tuesday, November 10, 2015

A Little More Ringz

Busy, busy, busy here!
More surprises coming soon. Hopefully in the next week or so. It is an amazing amount of work to make wonderful surprises be so special!
(How is that for a teaser?)

In the interim, here is a tangle I introduced in the Tangle It! Journal which sat as the #1 Hot New Release on Amazon for 30 days. (They only let you hold that spot for 30 days.)
It is called ringz and I will give you a step out for it tomorrow, along with more art to show you what ringz can do.
It is one of those fun tangles that you can draw and just focus on little line after little line.
More tomorrow.

The Creator's Leaf

Sunday, October 4, 2015

NEW TANGLE: Knights of the Round Table

 I love introducing new tangle patterns!
Here is one I designed that you will find in our new book
 This is a fun tangle that came to me one night
as I was watching Merlin episodes on Netflix.
Lots of ways to vary this pattern.
 As well as plenty of ways to incorporate it into your art.
Shading really makes this tangle stand out.
You can just go crazy mixing it up with other round tangles like I did here.
Or other tangles. They don't need to be round.
Knights of the Round Table is a fun, versatile, 
easy to incorporate tangle
I hope you love it and use it alot!

To pick up your copy of the Tangle It! Journal,
click here or here

The Creator's Leaf

Wednesday, July 22, 2015

Alcohol Ink on Yupo Paper

These are so much fun to do!
Alcohol inks come in a wide variety of colors now,
not like when they first came out years ago.
And the yupo paper is non-porous so it is exactly 
what you need for this technique to work.
I love the way the colors are unpredictable.
They work differently every time you use them.
I made about twenty backgrounds and have been
slowly tangling on them.
I use an XS Pitt pen, works great gliding across the yupo! 
So much yumminess!
I love it!

Alcohol inks are a product of Ranger.


The Creator's Leaf

Saturday, April 25, 2015

Stacking Circles

 Lately it's been all about the stacks.
Stacks of tangles. 
In this case, it's a stack of tangled circles.

Now you know I love me some gorgeous colors,
but I did not make this background myself.
It came from this book.
(I was going to tell you what page, 
but this awesome book doesn't have page numbers.
So that's not going to happen.)

I purchased three of Mindy Lacefield's books and they are all beautiful! They are copies of her personal art journals with lots of open spaces where a tangler could have some fun. And I love the results!

Why don't you grab a book you haven't enjoyed in awhile, 
or a book from a second-hand shop,
and tangle a little today?
You'll be glad you did.

Friday, March 27, 2015

Spring Colors With the Steps

I started this piece a few months back
and am just now getting back to it.
Let me walk you through the making of it.
One night I had a short window of time to work with,
so I decided to set up a few backgrounds to tangle
on later. 
I really, really love everything I know about
Stillman & Birn.
Their sketchbooks are wonderful!
Heavyweight pages, smooth surfaces, a sturdy cover,
and they come in a range of styles.
My favorite is the Zeta Series.
180 lb. paper, smooth surface, natural white.
Does well with a lot of water/wet media.
 So I used my Zeta series 6" x 8" sketchbook.
I began by placing paper under the page to
keep any wet/color from bleeding/running
onto the next page.
Good thing, too, because I decided to make the next page hot pink!
I spritzed the whole page with water,
then used two colors of Dylusions Ink Sprays.
I sprayed Vibrant Turquoise and Lemon Zest on top
of water and let the colors start running.
Don't worry about that little curving of the paper.
It settles down flat as the inks dry.
 Then I sprayed more water and tilted the sketchbook
from side to side, and back and forth
to get the colors mixing and covering the page.
One trick I've learned is this: 
where you have little specks of color, little dots that
spray out to the sides of your color shot,
spritz some water onto those blank areas
and you will be surprised how much color is actually
there that you don't really see with the eye.
This will give you some lighter areas of color.
And wherever you have too much color, or the color is too dark, 
or you are starting to get concerned about mud,
blot it with a paper towel and lift some of that color.
I keep a roll on my work table.
Actually I buy the pack of 12 rolls from Wal-Mart when they are on sale.
 This is what I ended up with. 
Remember I just used two colors on this page,
yet I see yellows, blue, turquoise, a darker blue,
pale green, spring green, and darker green -
all from the two colors I started with.
I love Dylusions Ink Sprays!
 An important thing to remember is these colors are not watersafe. If you use wet media on top of this page, the colors may very well start moving and blending again. As long as you remember this, you can work with it. It really isn't that big a problem.
To start building my page, I used two stamps strategically placed.
Hahaha! What was my strategy? 
I had no idea. I just like these two particular stamps.
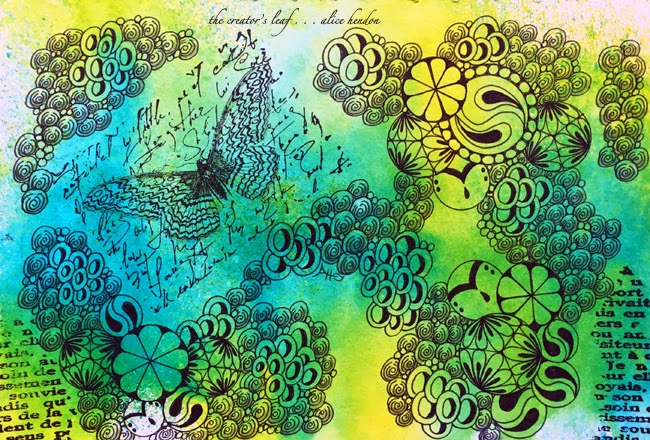
 Then I set the sketchbook aside for a couple months while I worked on other things. Two nights ago I picked it back up and added these tangles. Just look for pops of colors, sections, blobs, areas, whatever you want to call them and add tangles in those sections. I started with the larger circles - the Frankles calls them balls - and made three sections with those. Fleurette, cruffle, kuke, and my own matahari. Then I added some bubbles, tipple, and printemps around them.
Last night I kept adding in those sections of primtemps, bubbles, and tipple,
connecting them to the three sections of balls, tieing all those sections together.
I even added a free-floating section over the butterfly.
Did a little shading and I'm done.
Super easy piece to make,
the colors are awesome,
and I'm happy with it!
A nice mixed media looking piece created with ink spray and a Sharpie fine point.
Just those two things.
Nice spring colors make me smile!
And you can so totally do this yourself!

Sunday, March 22, 2015

Lucky Cat

 So excited!
This is my first template animal and I really like the way he turned out.
 On Facebook there is a wonderful artist named Ben Kwok. 
Ben administrates a group called Ornation Creation, where he regularly posts templates he has made for us to take and tangle. 
If you are a Facebook aficionado, you should check out Ornation Creation.
Ben gave us the above cat template, which I printed out on cardstock and started tangling.
Next time I will use watercolor paper, I wasn't convinced I could actually 
pull this off this time. Hahahaha!
 Ben also has a Facebook page called BioWorkZ.com where he features his own work.
He is really incredible! Worth taking a look.
I promise!
I just kept filling in tangles. 
The idea I went with was the oriental lucky cat -
typically done in either gold or white with touches of red.
I kept the tangles simple.
The gold was a metallic Pitt Artist Pen,
the reds were a combination of PrismaColor pencil and Uniball Signo pen.
Shading made all the difference.
It usually does. 
And there you go.
My first Ben Kwok template tangled and framed
in a dark red, wooden 8" x 10" frame.
Yay!!!!!
Now to decide what to work on next. 
He has 94 templates posted on the group page,
so there's plenty to pick from!

Saturday, March 21, 2015

Happy Birthday, Frankles!

Two years ago today our little Frankles arrived - 5 weeks early.
Perfect health. Mom Bobbie was having some problems,
which required Frankie to come a little early.
 She was a tiny little thing.
4 lbs, 9 oz. if I remember right.
That's Jason's hand on her tummy.
I was able to get to the hospital in time to spend
a few minutes with my son before he joined
Bobbie to deliver the baby.
He was scared, nervous, excited, and anxious 
all at the same time.
I think it was the best 15 minutes I ever spent with my son.
Waiting for his daughter to be born.
Brings tears to my eyes - every time I think about it.
These precious little toes are two years old today,
and she's busy running, climbing, jumping.
A busy little girl,
a sport, lots of fun,
happy, and a singer of loud magnitude.
Hahahaha! I love her so much!
Happy birthday, little Frankles!
Hahahahahaha!
I believe flowers are always appropriate
for a birthday celebration!

Tuesday, March 17, 2015

Trying to Get Back in the Routine

Wow! It's been twelve days since I posted.
And, yes, I realize my blog looks weird.
Having a bit of an issue with photobucket,
hopefully Cindy will be able to figure it out soon.

I had a wonderful trip to Colorado, and the great news is
I did not have an issue with the altitude.
The medicine the doctor put me on worked!
Hallelujah!
I was pretty groggy the first several days,
but eventually I was able to do a little tangling.
This is the biggest project I worked on.
A little flux, rock n'roll, rain, beadlines, cruffle,
TootsieMoon and blox.
A fun piece to draw!

I'm working in the studio -
re-organizing - again.
One of the CZTs started a facebook group
for studios and it has started a desire
to re-organize.
Stay tuned in a couple weeks for new studio shots.

Saturday, December 27, 2014

Pink and Blue Swirls

This project was begun a couple months ago.
This is the end result.
Ta-da!!!!
It began like this.
I used a 9" X 12" sheet of Canson watercolor paper,
plenty of water in a spray bottle,
and Dylusions Ink Sprays - 
bubblegum pink and london blue.
I love the colors I can get with the Dylusions - so much fun!
Some of those round places - like the blue one just below the center -
was made by holding a heat gun straight down
above a wet puddle of color - 
until it dried.
Here is a link to my tutorial on using Dylusions.
This is the same blob of color - tangled.
Look how I divided up the sections and drew patterns on them.
That's what I did with the whole sheet.
Wherever I felt tangling needed to happen - it did.
This section is on the right, about halfway up.
This section is towards the middle,
but for the life of me I can't tell if this photo is
turned the wrong direction or not.
Just keep tangling and pretty soon 
you will turn this . . .
. . . into this.
I promise!
If I can do it - you can, too.
All you have to do is start.
And if you don't have Dylusions - 
I started with a simple watercolor pan set
from the school supply row in Wal-Mart.
They make some pretty beautiful artwork, too!

Sunday, December 14, 2014

Christmas in Florida

Yes. You did read that title right.
Christmas in Florida.
It's a rough life, but someone's got to live it.
These are two cell phone pictures I took in Orlando,
at the Walt Disney World resort complex.
Swimsuits, beach balls, music, laughter, joyfulness.
And that is normal for this time of year in Florida.
Here is another tile I drew while I was there.
On a 3 1/2" tile, sprayed with Lindy's Stamp Gang's
Flat Fabio sprays.
Love those sprays!
Then I had some fun with cruffles, jetties, and kuke.

Sorry about those sunny pool shots!
But seriously,
someone has to live here!
And I am up for the challenge.
Hehehehehe!

Friday, July 11, 2014

Star Unraveled

 This is what I've been playing with lately. Not an idea that I came up with, but based on a piece of artwork created by my friend and fellow CZT - artist Sharon Payne . . .
. . . that I saw and loved! Sharon calls this piece Dreaming at Sunset. You can see this - and more of Sharon's beautiful art - on her blog Jazztangled. I was really drawn to the leaf shapes and the little pieces dangling and swirling out the ends of them. 
So I picked up a pen and a sheet of 9" x 12" bristol smooth surface and started drawing. I sat in my chair and drew for two hours. That is pretty intense for me. I can play with paints and inks for two hours, but drawing for two hours is a completely different story. I toyed with the idea of the almond shapes with the tendrils flowing out the ends. And somehow they ended up in a star-ish shape - I think someone else may have drawn them in this shape first, but I couldn't remember who. (So, sorry if I miss giving credit to someone for the idea.) I love all the loops, and swirls, and curls, and furls. Kind of like a star just unraveling and spilling everything right out there.
Then I moved on to a smaller version. I had some scraps leftover from a book project - with dylusions ink spray colors already on them - and I used one of those. This piece is about 4" squared. There are a couple background pieces on the right that you haven't seen yet. I'm still working on those.
And of course I had to play around some with the settings on my iPad when I took this picture. This filter is called process. Apparently some rocket scientist named the filters. Who knew. 
Anyhoo, here she is - Star Unraveled - in all her beautiful, bright, wild and crazy unedited color! Keep in mind she's about 4 inches across and compare that with the size you see on your computer screen and you'll know about how big this piece truly is. And please go check out Sharon's blog here. You'll love visiting her! (And just read her posts with a soft, southern drawl and y'all will feel right at home.) (And I can say that cause I'm from the south, too!)

New in my studio? A brand new product from Zentangle.com that we will be releasing to the public in a couple weeks. Until then I get to play with it all by myself - bwahahahaha! 

The Creator's Leaf

Monday, June 2, 2014

Last Scrap

Let's see. By this time, I should have already been in the pool a couple times, Mark should have already had the boat in the water and caught a bunch of fish. He will also be sunburnt - - - cause that's the way it works. And I expect either Mike or Phil or both will have been here, or they will be on their way to fish! And I will be sitting in the room - or on the balcony in the swing - and I will be drawing and watercoloring. Yay!!!! I can not wait!!! (I totally wrote all this at home on Saturday and scheduled the post to pop up now :D ).
The Creator's Leaf