Showing posts with label fescu. Show all posts

Wednesday, July 8, 2015

Coloring Page Perhaps?


I drew this quite awhile ago and never posted it.
I found it buried on my desktop :).

With all the interest in adult coloring pages these days,
I am thinking this could be a possible start for one.
It was extremely easy to do,
it just took quite awhile.

So, what do you think?
Coloring page, or not?

And, yes, if you should want to print it out to color,
please feel free to do so.
And if you would be so kind as to send a photo of your finished work to 
kenoly2000@hotmail.com
and put Coloring Page in the subject line,
I would love to post it on my facebook page
The Creator's Leaf.
Thanks!
The Creator's Leaf

Friday, June 12, 2015

Sunz, New Step Outs

Sunz is a tangle I started drawing a couple years ago.
I have some step-outs on my pinterest board
and buried here in my blog,
but figured now that I know how to draw
better step-outs, I would give it another go.
This is the actual piece of art I designed sunz for three years ago.
It was one of the very first zentangle inspired
pieces I drew. 
That wall behind the sunz, is another tangle of mine called crete.
My drawing skills have developed a bit in three years, too. 
Hahahaha!
Here is a piece I tangled this afternoon,
featuring sunz!

Please feel free to pin these newer step-outs.
They look so much better!

Sunday, May 17, 2015

Old Becomes New

I used to be a scrapbooker.
Digital technology has taken away the need for me to scrapbook,
but I still have a ton of scrapbook supplies.
Recently I figured out that I could tangle on the paper.
I have enough scrapbook paper cut down into manageable pieces to last me for a couple years.
I used to have an online scrapbook store,
and I bought out the paper from two stores that were closing,
so seriously I have a bunch of paper.
I pulled out a 5" x 7" piece of this butterfly paper 
and tangled some new patterns.
New for me.
From bottom to top:
logjam, feather nesting, xyp, ovy, fescu, jute, 
African Artist, and lanie.
It always amazes me what a difference shading makes!

Do you have scrapbook paper that might look
awesome in a tangle?
How about with a stack of tangles?

Thursday, January 22, 2015

Working on Snow

 No, it isn't snowing here in Florida.
At least, not that I know of. Hahaha!
That could be a little but of wishful thinking
on my part!

So, I've been playing with snowflake making
for an art journal prompt,
part of a group project I'm involved in for 2015.
I really love how this one turned out,
but then you know I'm all about that color, that color!
Such a fun process and I tried some new technique - 
for me, anyway.
The beautiful background color was done with
Prima's Color Bloom Spray Mists.
Yummy color with plenty of oomph and sparkle.
The sparkle was a surprise, 
I had no idea the sprays were going to do that.
I love it!
Then I tangled my snowflake over the top of 
that yumminess with a Sharpie fine point.
I've seen some discussion on Facebook today
about using microns over inks and paints.
(I used to use a micron all the time - with no problem.
I just found I was too heavy handed and wore the nibs out
before I ran out of ink.
Sandy Bartholomew mentioned the Sharpie fine point
somewhere and I've been using them ever since.) 
Then I took two Derwent Inktense Watercolor pencils 
to add all the shading, with the assistance of an
aquash waterbrush. 
Love how it turned out! The overall snowflake is
about 4" x 5".
Time to go order a few more of those wonderful
Color Bloom Spray Mists.
I see a new favorite product on my countertop!
This post brought to you courtesy of Studio Assistant Aurora.

Have a great weekend!

Sunday, December 7, 2014

Punzelair

Recently we have worked on a few of the harder tangles to draw. Punzel being one of those. You can see the step-out for it here. It's really fun to draw, all loopy and wavy like a bunch of seaweed. Mix it up with a little dragonair - they go perfectly together. Throw in a herd of clamshells ala printemps, some zingers and flux plant life and you have one awesome underwater scene starting to take place!

Saturday, November 1, 2014

Betweed, Diva Challenge #191

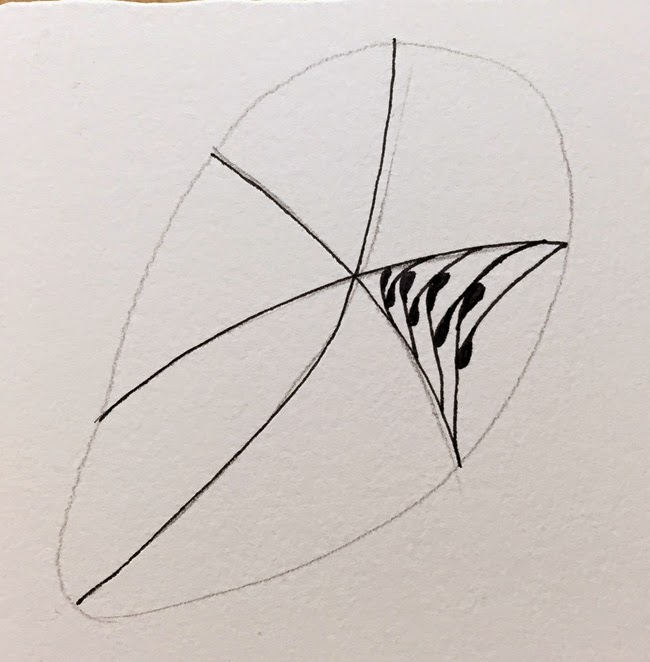
This week's Diva Challenge was to make a monotangle using the pattern betweed
This is a tangle I use in small areas,
not one I normally do as a monotangle.
Here is what I did:
I used a standard 3 1/2" square official zentangle tile.
This wonky oval in pencil became my string.
Using a micron, I began my betweed with some
overlapping, arcing lines creating six sections.
Then I took one section at a time
and drew the alternating lines that make it
betweed, ending each line with a 
little fescu.
I kept adding one section at a time . . .
. . . until I had each section tangled with betweed.
Typically in zentangle® we don't use erasers.
The lines are supposed to blend into the drawing.
I elected to ignore that directive and I erased the outside line - my string.
To make this piece of art have a more finished look,
I added more fescu into the outer edges of some of the sections.
Shading with a pencil provided dimension.

To check out all the offerings of betweed
head on over to Laura's page here.
There is still time for you to try a little betweed of your own. 

The Creator's Leaf

Friday, October 31, 2014

More of Those Cute Little Twinchies

At least I think they are cute little twinchies!
Two inch squares of awesomeness.
Oh! And some beautiful color also!

My eyes are doing better today.
We think I was having problems with allergies.
Who knew there was pollen when half the country
is getting ready to face snow?
Yep! Pine pollen in sunny Florida.
Yet another reason not to live in Florida.
That and the killer hot summers!
Did I mention I love snow?

The Creator's Leaf

Friday, August 22, 2014

Spill Ink on Your Project?

I have had a request for more tutorials here on The Creator's Leaf, but I have to tell this tutorial was not a planned one. This is a post of necessity.
Off and on for the past week I have been drawing - and adding to - this 8" x 8" tangle. A little here, a little there, as I had the time. Last night I was happy with where the drawing had arrived and pulled out my copics to start some coloring.
I was rolling along fairly well until this happened. Do you see it, just there? (I sound like Hermione to Ron, "you have dirt on your nose. Just there. Did you know?") My pinkish copic was working very well as I colored parts of those zingers, then all of a sudden a big blob of color popped right out and onto my paper. I had no chance to even react. The marker just spit that color right out onto my drawing I've been working on for a week. Needless to say I was not happy.
So not happy. I grabbed my blender and tried to salvage some of the area, this was the best I could get the blob reduced to. I was so not happy. I can't even tell you how not happy. I shut everything down for the night and went to sleep.
My original thought last night was to throw the whole project in the trash, thankfully I didn't do that. I've told my kids over the years something I learned from my dad - that typically nothing is broken so badly that it can't be fixed, or mended, or altered in a workable manner. So. I woke up this morning with the thought that  - shoot! I can totally camouflage that blob! So out came my trusty little circle template. I had circles spaced around the project already, I just decided to add another. If I  hadn't already had circles figured into the drawing, I could have certainly added them at this point. I just needed to figure out a way to salvage what I already had - by adding something else. Pulling out an existing element and making it work in this blobby area.
In my haste - and probably partially due to all the cold medicines I'm taking - I didn't even realize I drew right over the top of the zinger stem. I also drew into the leaf - which I did realize. Ugh. So I grabbed a small tip pen and drew hash lines along the edges of some of the leaves to camouflage the error. 
To cover up the line through the stem - I added lines to all the zinger stems. Not a big deal, an easy fix. Then I drew another circle to go around that pink blob.
Finished coloring the circle, added some hashlines to a few other leaves to balance the drawing out, and I had my pink blob repaired and good to go.
Then I finished up the coloring with some other copics, At You Spica glitter pens, and my Wink of Stella glitter markers. Love those pens!

So, if you need to cover up a blob of ink - or a portion of your drawing that didn't turn out like you expected - look for an element that is already present in your drawing. Perhaps you will find one that you can replicate in the problem area to camouflage/fix it. And have fun!

(The idea for this drawing came from artwork of my friend Marizaan Van Beek. Marizaan is a fellow CZT who lives in South Africa.)

Sunday, August 17, 2014

Poured Out, and APR #119

It has been a bit of a rough week for me. (You know, I think yesterday's post started with almost identical words. Sorry. I do know more. Honest.) So. A bit rough. I won't go into it here. Suffice it to say the week took a lot out of me. 

You ever have a week where you just don't want to get out of bed? For any reason at all. That's still me. No motivation. At all. So I am making myself go through the routine. Making myself stay busy. 

I started this drawing a week or so ago. I don't really even remember where I was. Maybe at Kali's. Anyway, I pulled it out last night and shaded parts of it. This morning as I look at it - on this day of worship - I immediately saw a basket at the lower left corner. So not planned. A basket with lots of lovely, fun, hopeful things bursting forth from it. Joy, frivolity (is that spelled right? no little red, sguiggly line so it must be), happiness, playfulness. And I think - why not? This week will be what I make it. 

So. I decide right now to make this week a better one than last week. I decide right now to be happy, to be satisfied with my life as it is. But I also decide to strive towards what God has planned for me - and I know that He wants me to be fulfilled and to be serving (cause that's who I am. I am fulfilled when I am serving.) 

How will you live your week? How do you decide - right now - to make this coming week even better than this past one?

(I am linking up to the Artist's Play Room this week. Check it out here.)

The Creator's Leaf

Friday, July 11, 2014

Star Unraveled

 This is what I've been playing with lately. Not an idea that I came up with, but based on a piece of artwork created by my friend and fellow CZT - artist Sharon Payne . . .
. . . that I saw and loved! Sharon calls this piece Dreaming at Sunset. You can see this - and more of Sharon's beautiful art - on her blog Jazztangled. I was really drawn to the leaf shapes and the little pieces dangling and swirling out the ends of them. 
So I picked up a pen and a sheet of 9" x 12" bristol smooth surface and started drawing. I sat in my chair and drew for two hours. That is pretty intense for me. I can play with paints and inks for two hours, but drawing for two hours is a completely different story. I toyed with the idea of the almond shapes with the tendrils flowing out the ends. And somehow they ended up in a star-ish shape - I think someone else may have drawn them in this shape first, but I couldn't remember who. (So, sorry if I miss giving credit to someone for the idea.) I love all the loops, and swirls, and curls, and furls. Kind of like a star just unraveling and spilling everything right out there.
Then I moved on to a smaller version. I had some scraps leftover from a book project - with dylusions ink spray colors already on them - and I used one of those. This piece is about 4" squared. There are a couple background pieces on the right that you haven't seen yet. I'm still working on those.
And of course I had to play around some with the settings on my iPad when I took this picture. This filter is called process. Apparently some rocket scientist named the filters. Who knew. 
Anyhoo, here she is - Star Unraveled - in all her beautiful, bright, wild and crazy unedited color! Keep in mind she's about 4 inches across and compare that with the size you see on your computer screen and you'll know about how big this piece truly is. And please go check out Sharon's blog here. You'll love visiting her! (And just read her posts with a soft, southern drawl and y'all will feel right at home.) (And I can say that cause I'm from the south, too!)

New in my studio? A brand new product from Zentangle.com that we will be releasing to the public in a couple weeks. Until then I get to play with it all by myself - bwahahahaha! 

The Creator's Leaf

Tuesday, July 1, 2014

One More TootsieMoon

As promised, one more tile featuring TootsieMoon. You've seen it straight, you've seen it round, and now you see it meandering. In case you didn't see the step-out for TootsieMoon, scroll down to the next post and you can see step by step how to draw it out. How to tangle a little TootsieMoon for yourself. And once again - no shading on this piece yet, because I want to color it first. Maybe. Not sure. I'm kind of liking it just like this. So maybe a little shading to come. Hahaha!

Today I also finally did some cutting on a couple sheets of handmade Japanese paper that I bought in Toronto a short time ago. I was really nervous about that - but everything turned out great. I took photos and I hope that will be a post for tomorrow. In the meantime - have fun with TootsieMoon!
The Creator's Leaf

Sunday, June 29, 2014

Floral Color

Recently, I posted the black and white version of this tile as part of a weekly challenge. You can see the post here.
This is what I started with. Some fescu, some mooka,  some sunz, some printemps, some tipple, and some flora. All tangle patterns with a bunch of aura-ing. Then today I added color with Grumbacher transparent watercolor pans and some Derwent Inktense watercolor pencils. Highlights came from a white gelly roll pen. 
Lots of fun and super easy to draw! Soon I will provide a step-out for flora. Hopefully :). Have a great week!
The Creator's Leaf