
Showing posts with label matahari. Show all posts

Friday, March 27, 2015

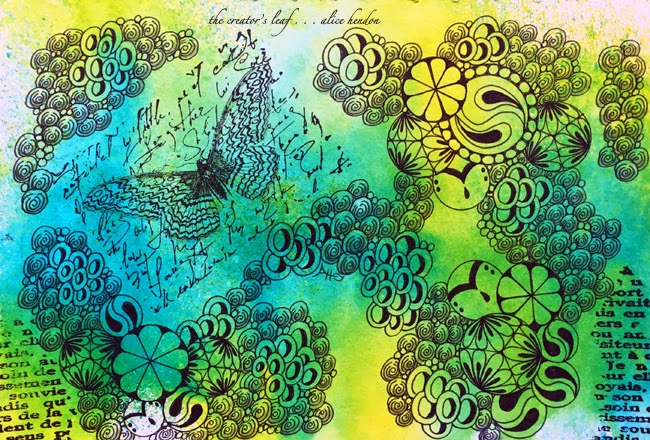
Spring Colors With the Steps

I started this piece a few months back
and am just now getting back to it.
Let me walk you through the making of it.
One night I had a short window of time to work with,
so I decided to set up a few backgrounds to tangle
on later. 
I really, really love everything I know about
Stillman & Birn.
Their sketchbooks are wonderful!
Heavyweight pages, smooth surfaces, a sturdy cover,
and they come in a range of styles.
My favorite is the Zeta Series.
180 lb. paper, smooth surface, natural white.
Does well with a lot of water/wet media.
 So I used my Zeta series 6" x 8" sketchbook.
I began by placing paper under the page to
keep any wet/color from bleeding/running
onto the next page.
Good thing, too, because I decided to make the next page hot pink!
I spritzed the whole page with water,
then used two colors of Dylusions Ink Sprays.
I sprayed Vibrant Turquoise and Lemon Zest on top
of water and let the colors start running.
Don't worry about that little curving of the paper.
It settles down flat as the inks dry.
 Then I sprayed more water and tilted the sketchbook
from side to side, and back and forth
to get the colors mixing and covering the page.
One trick I've learned is this: 
where you have little specks of color, little dots that
spray out to the sides of your color shot,
spritz some water onto those blank areas
and you will be surprised how much color is actually
there that you don't really see with the eye.
This will give you some lighter areas of color.
And wherever you have too much color, or the color is too dark, 
or you are starting to get concerned about mud,
blot it with a paper towel and lift some of that color.
I keep a roll on my work table.
Actually I buy the pack of 12 rolls from Wal-Mart when they are on sale.
 This is what I ended up with. 
Remember I just used two colors on this page,
yet I see yellows, blue, turquoise, a darker blue,
pale green, spring green, and darker green -
all from the two colors I started with.
I love Dylusions Ink Sprays!
 An important thing to remember is these colors are not watersafe. If you use wet media on top of this page, the colors may very well start moving and blending again. As long as you remember this, you can work with it. It really isn't that big a problem.
To start building my page, I used two stamps strategically placed.
Hahaha! What was my strategy? 
I had no idea. I just like these two particular stamps.
 Then I set the sketchbook aside for a couple months while I worked on other things. Two nights ago I picked it back up and added these tangles. Just look for pops of colors, sections, blobs, areas, whatever you want to call them and add tangles in those sections. I started with the larger circles - the Frankles calls them balls - and made three sections with those. Fleurette, cruffle, kuke, and my own matahari. Then I added some bubbles, tipple, and printemps around them.
Last night I kept adding in those sections of primtemps, bubbles, and tipple,
connecting them to the three sections of balls, tieing all those sections together.
I even added a free-floating section over the butterfly.
Did a little shading and I'm done.
Super easy piece to make,
the colors are awesome,
and I'm happy with it!
A nice mixed media looking piece created with ink spray and a Sharpie fine point.
Just those two things.
Nice spring colors make me smile!
And you can so totally do this yourself!

Thursday, February 19, 2015

Garlic and Joey

I've been playing with this shape a lot lately.
(I'm so cold I'm having trouble typing.
Back space, correct, go forward, repeat.)
Playing with different ways to fill this shape -
that totally looks like a bulb of garlic to me,
for some reason.
That background is a 5" x 7" pull from a gelli plate.
Joey's Challenge this week was called 
The Polka Dot Tangle.
Randomly drawn circles, 
each filled with a different tangle.
It's really good practice for quick tangles.
For this 5" x 7" piece, I used my new 
Prima Color Bloom Spray Mists.
I've used them before and my pens worked great over the color, but for some reason this time
my pens did not work so great. 
I used a sharpie fine point and had
trouble filling in the dark areas.
I tried shading, but the color wouldn't hold
the graphite. So. Here it is.
Unshaded but that's ok.
To participate in Joey's Challenge,
just go here and check it out. 

Saturday, June 14, 2014

Let Me Show You The Steps

People laugh when I tell them I can't draw, but seriously - I can't! What I can do is take something one step at a time, and keep adding and building on it until I am finished. Let me show you what I mean.
Let's draw this tile. This is my completed project and is was easy peasy to do. (Is that how you spell that? I always think about English peas in a can and just add a 'y' to it, but that doesn't mean it's right.)
Anyway, let's draw! I began with a 3 1/2" square piece of paper. In the tangle/zentangle world we call this a tile. (And I am going to go ahead and apologize for the angle of these pictures. I took these on a night when I was once again having achilles tendonitis issues and was sitting on a chaise lounge icing my ankle. Thus the angle. Sorry.)

So. Take your tile and a pen (I use a Sharpie fine point) and draw a random squiggly line across a good portion of the tile. This is the line you will build your drawing from. 
Then start at one end of the line and draw a running zig-zag line from one end to the other, crossing back and forth over your original line. This tangle - or pattern - is called rain. It is one of the official zentangle patterns. Your zig-zag does not need to be evenly sized, so don't worry about that!
Now use your pen to fill in all those lovely little triangles with ink. You will have a curvy rope of blackened triangles when you are done.
(One little trick to remember - and it will make a world of difference - is to turn your tile as you draw. If it is easier to draw with the tile turned in a particular direction - turn it. I find myself rotating mine all the time to make it easier.) Next I want you to mimic the triangles with a running line that lightly borders it. This is called an aura - which is defined as  an emanation surrounding something. I try to do mine about 1/4" from whatever I am auraing. (Say that 20 times fast - auraing, auraing, auraing, auraing, I can't even type it fast!) Draw your aura along one side of the triangles, then turn your tile and draw an aura along the opposite side of the triangles.
Now I want you to aura the whole thing. One looping aura on each side of the rain line and zig-zags. Then I went back inside the four inner loops and made another little aura in those. You may or may not have these loops - depending on how big you drew your line originally. 
Inside those four loops, I drew a tangle I designed and named matahari. There is a bit more to it, but I just used part of it for this drawing. Start at the top of one of the loops, make a rounded v-shape down into the loop, and add a little tiny tear drop - like water dripping off - under it. 
Next, thicken up those outside lines. You can either do this with a wider pen/marker - or you can draw another line close to your outer auras and fill it in with black. Whatever is easiest with the pens you have. I just loped it across the top and under the bottom. I think this is called thickening your lines, but I'm not absolutely positive. (This is my blog, so I guess I can call it anything I want to. Right? Hehehehe!)
Along the outer edge of those thickened black lines, add a line of little black humps - try to space them somewhat evenly. This is beginning of another official tangle called crescent moon.
The next step in crescent moon involves more auraing - yay!!! you should have that auraing thing down by now. So, I want you to aura two lines around those crescent moon shapes along both sides of your drawing. Remember - turn your tile as often as you need to.
(And can you believe it? You are almost done!)
Next, I took a white gelly roll pen and made a little tiny circle in the center of every one of those crescent moon hump shapes. It just adds a nice highlight. If you don't have a gelly roll pen, a white pencil may also work. (Or you could leave that part out and come back to it after you make a trip to Michael's to buy a white gelly roll pen. Hahaha! I know you want to!)
I have a clear glittery gelly roll pen that I used to fill in the outer auras. This is not a necessary step, but one I enjoy using a lot!
Your drawing is now complete. To give it some depth, some 3-D'ness if you will, take a pencil and light shade a line along the inside of those large auras. I just use the side of a regular pencil - along with a light touch! Then you can smudge that line with the tip of your pinkie finger. This little bit of shading will make a world of difference in your finished drawing. It makes those curves recede and gives more dimension to your art. You now have a finished piece of art that you can be proud of! (And if anyone cares - we used three tangle patterns in total.)

There are lots of tangle patterns! I mean loads and loads! There are a couple places you can find them if you want to try your hand at some more drawing. I have a bunch of pinterest boards here that show the steps to hundreds of tangle patterns, as well as boards showing completed tangle art. You can also find patterns online at Tangle Patterns here.  New ones show up there all the time. Now, go have some fun! You'll be glad you did! And congratulations on that awesome piece of art you created!

Wednesday, May 21, 2014

Frankie Time

 We are going to be spending some time with our little Frankie Bear this week. Mom and Dad are working long hours, so she's staying with us! Yay!!!  Started our visit with a trip to Wal-mart for a few things we forgot and then a stop at Sonny's for some mashed potatoes and french fries!
This was actually while we were waiting on our food to arrive. Frankie talked, threw toys on the floor, ate lots of snacks, actually grabbed one of the servers by the hand as she walked by, and made friends with people sitting at the two tables closest to us. And now she is actually sleeping in her new little pack-n-play, holding her sock monkey in her arms.
I expect this will be the only post for today, so here is a piece of random art. No idea what I was going for here, other than lots of roundness :) that seems to be the mode of the day lately when I'm drawing.


The Creator's Leaf

Wednesday, March 19, 2014

A Nighttime's Drawing, APR #97

I'm back in Maryland spending some time with Kali. I drew this after supper a few nights ago, in my Stillman & Birn Zeta Series sketchbook. The color comes from bubblegum pink and lemon zest  Dylusions Ink Sprays with some spritzed water. Lots of liquid. How did the Zeta Series hold up? Fantastic! No warping at all, just lots of gorgeous, brilliant color! Add a little sharpie in black and you have a fun piece of art.
just add water silly's blog hop link
I'm linking this up to the Artist's Play Room post for the week. You can check it out by clicking on the APR box.

The Creator's Leaf

Sunday, November 3, 2013

Here I Am to Worship

Sunday morning and I am listening to Trinity Baptist Church here at home via the  internet. Right now they are singing: I Worship You, Almighty God, there is none like you. It's a nice 66º outside and the sun is shining. What a beautiful start to my day. 

May God richly bless you and your family today. May you feel His arms around you, hugging you close, loving you, being there for you. Close your eyes, rest in His care. Know that you are loved. Right now, right where you are. God is there, too. And He cares about you.
The Creator's Leaf