Showing posts with label stamp. Show all posts

Friday, February 8, 2013

Splashin' Some Paints

 
 I've been wanting to play with paints lately and today was the day!
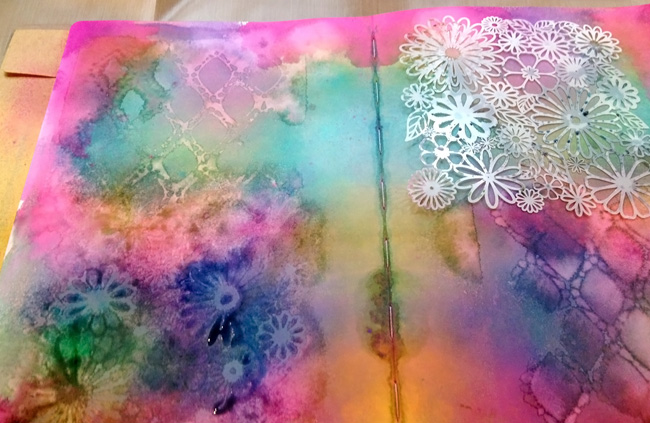
These are the two final results. I know I still want to do a lot with these two-page spreads, but I'm still contemplating exactly what. Easy-peasy and literally about 10 minutes per spread. Here is what I did.
I started with Dylusions' Creative Journal by Dyan Reaveley. It's a large 11 13/16" x 9" journal, with pages measuring 11 3/8" x 8 1/4". The pages are heavy duty cardstock that hold up to lots and lots of water. I spritzed some water onto my paper, then I sprayed a bit of vibrant turquoise Dylusions Ink Spray onto the wet page.
To make this spread I literally used three colors. As they spread and mix, they make other colors. In addition to the turquoise, I sprayed on some Bubblegum Pink . . .
. . . and Lemon Zest. Then I spritzed more water onto the page . . . 
. . . and closed the book. I pressed down the pages with the book closed, then opened it back up again. At this point I had wet, gloppy color on both pages.
I used a wad of paper towels to blot up the water. I added bits of color in the blank spaces, and 
ended up with beautiful, bright colors.
These are the ink sprays I used.
Next, I took some stencils I also got from Dylusions. I held this one in place and spritzed some water onto the page - through the stencil.
I let it sit for a couple seconds, then lifted the stencil. At this point my stencil was wet on the top side, so I turned it over and placed it face-down on the adjacent page. 
I pressed it down, then lifted it and removed it. I let both pages sit with the water on them for about 30-45 seconds. The wetness of the water re-activated the ink and the color started lifting everywhere the water was. After that 30-45 seconds, I dabbed the wetness with the paper towel, and dried my page with a heat gun. This technique is called 'ghosting.'
I loved the pages just like this, but still wanted to add to them.
I inked a stamp with Stayz-On ink and
stamped it onto my pages in two different spots.
This was the end result. I will probably do more work on this, and at the absolute least I will tangle on these pages.
My second set of pages started off like this.
I applied the ghosting technique with some steampunk elements.
I really love this set also! I know that I will add more to these pages tomorrow. I will have to show you more photos when I get them complete. Now, off to tangle on the pink pages! I can't wait to see how they turn out!

The Creator's Leaf

Wednesday, January 30, 2013

Coming Soon, Are You Ready?

It's almost that time again! It will be here before you know it. I was trying something different here. Something different for me. An ATC card. I had not done one before. They are so small - just 3.5" x 2.5", not much room to work with, but so much fun! I watercolored this tile first, then used a good ole-fashioned rubber stamp, to add some words, then tangled till I couldn't think of anything else to do. Then I added that cute little rhinestone that you can hardly see in this shot - on the 'i' in mine. Yep, it's almost here!

The Creator's Leaf

Friday, September 7, 2012

Lovin' Me Some Watercolors!

Trying something different this week. Haven't played with my watercolors in awhile, so I figured it was time to make a new project. And I'm listening to Mandisa sing while I type, so if I ramble off into random lyrics please forgive me :).
I began with a 5" x 7" piece of Strathmore Bristol (vellum surface) paper that I cut down from a larger size sheet. I'm just noticing that the cover of the pad this came in says "dry media" - oh, well. I used water and paint, sometimes a fair amount of water, and it worked great! I began by drawing out my bubbled letters, then drawing the box around that. I neglected to take a photo at that point. Sorry, I'm still learning :). Then I brushed around some beautiful green watercolor paint.
Not sure how well you will be able to see this, but I'm showing the photo anyway. I like to plop some drops of color down, let it sit a few seconds, then dab it with a paper towel and hit it with a heat gun. If you look at those darker spots towards the bottom right you can see some of the paper towel texture. I just like the way it looks, gives a little variation, and it looks like I did something awesome!
(Mandisa's singing Broken Hallelujah, which I love! Whistling and singing going on here!) I used a couple different shades of pink - splashing around, holding paper up and tilting - letting small amounts move on the paper. (Dance, Dance, Dance is playing now :D.) After each addition of color I let it sit a few seconds then dry it with a heat gun. It keeps my colors from running together too much - unless I want them to run, then I get the colors the way I want them to be before I dry it.
Once the background was the way I wanted it to be - I moved on to some Derwent Inktense Pencils (I just realized I've been spelling that wrong in some past posts - I need to go fix that.) I used two different shades of purple/mauve to color in some of the banner border and I used the watered down color on my water brush to fill in a shade around the banner box.
Next came coloring in the bubble letters and their aura. Again I used the pencils. I like using them in small, tighter areas over the watercolor paints. Probably doesn't make a real difference but it's more comfortable for me.
Down the right I stamped in some flowers from a Ditto cardmaking stamp and placed some words from an old Disney stamp I've had literally for 8-10 years.
Then I tangled in some little heart balloons and flower thing-a-ma-bobs, cause I don't know what their real name is :). An easy-peasy piece to make. I told Kali I was going to put it in my Etsy store (I have one item in there - hahaha!) and she asked how much I was going to sell it for. So, I'm guessing I'll be making another piece to actually put in the store. Just a guess. 

And just so you won't be left guessing - Mandisa is now singing Voice of a Savior. What a victorious song!  You and I are not that different. We've got a void and we're trying to fill it up, something that'll give just a little peace. All we want is a hand to reach to, open arms that say I love you! We'd give anything to hear, the voice of a savior! I pray you have an incredible day! And thank you so much for taking time to read my ramblings - you are greatly appreciated!

I would like to count this post towards The Artist's Play Room for this week. The challenge was to celebrate our favorite color - that would be "pink for certain!" said the lady with the pink hair. You can check out all the lovely colored artwork at Jenn's place - just click on the box below :).
The Creator's Leaf
just add water silly's blog hop link

Tuesday, July 17, 2012

Watercolored Flowers For Kali

Photobucket
Lately Kali has been making an art journal. She's using an 8" x 6" three-ring binder and making her own pages to go in it. She asked me to make a couple pages she could put in her book - so I did. 


I cut an 8" x 6" piece of watercolor paper and got started. Above, I used a simple watercolor set and slapped on some yellows and greens for a background. No rhyme or reason - just get the paint on the page :). I used a stencil from TCW (TheCraftersWorkshop.com), some drywall tape, a dabber and some Studio G inkpads to lay down some background pattern.  I tangled the flower line next, added some Twinkling H2O paints on them, and drew in some spiraled vines. Stamped a couple butterflies, attached some tag and flower art and was pretty much done with my first side. 
Photobucket
Then I flipped the page over and worked on the back. I started the same way - by watercoloring some blues, teals, and magenta for a background. I sprayed on some raspberry Inkadinkado spray ink, sailboat blue Jim Holtz color wash, and some purple twilight Jim Holtz color wash. (I like the inkadinkado colors, but now all 10 fingertips are pink and I can't get the color off.) I used some stamps, a Sizzix punched flower, and an old music tag - no idea where it came from. Sorry. And I tangled some laced around the flower edge. Super simple page and Kali loved it! 


Easy. Simple to do. Fun. I need to do more of this!