Showing posts with label tipple. Show all posts

Sunday, July 26, 2015

Tangling on Scraps

This was a fun project!
I took a leftover piece of scrapbook paper and
trimmed it down to 5"x 7".
 I trimmed one edge with a bit of washi tape.
At first glance, this section reminded me of an underwater cavern.
Of course, most things remind me of underwater scenes.
Hahaha!
So I started sectioning off what I thought might be 
a big piece of coral.
 I finished tracing it out and used my tangle
coral for the main part,
then started stacking in some tipple at the base.
 That tipple slowly evolved into my signature printemps, 
forming the base in the shape of a hill.
 I really liked the orange band across the center and thought it would be a lovely place for a school of little fishies to be swimming past!
 And underwater you are going to have a little bit of current flowing, 
especially with those swimming fish - so I added some movement with beadlines. 
Perhaps that could be some algae or reeds growing along the bottom, moving in the water.
Then I added more beadlines, 
and a few more swimmers.
All in all, about 15 minutes time invested in this
really simple to make 
leftover scrap of paper project!

Friday, March 27, 2015

Spring Colors With the Steps

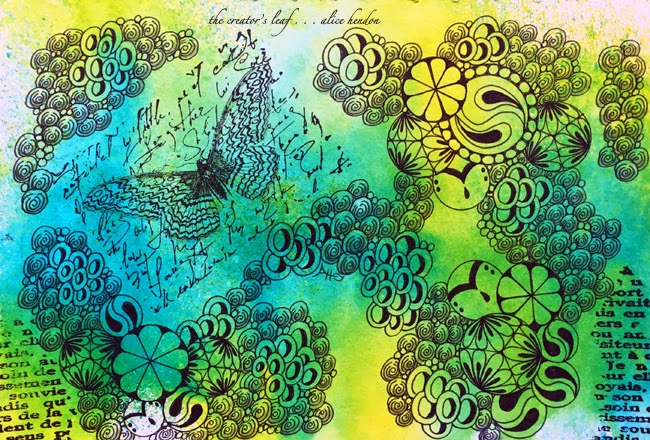
I started this piece a few months back
and am just now getting back to it.
Let me walk you through the making of it.
One night I had a short window of time to work with,
so I decided to set up a few backgrounds to tangle
on later. 
I really, really love everything I know about
Stillman & Birn.
Their sketchbooks are wonderful!
Heavyweight pages, smooth surfaces, a sturdy cover,
and they come in a range of styles.
My favorite is the Zeta Series.
180 lb. paper, smooth surface, natural white.
Does well with a lot of water/wet media.
 So I used my Zeta series 6" x 8" sketchbook.
I began by placing paper under the page to
keep any wet/color from bleeding/running
onto the next page.
Good thing, too, because I decided to make the next page hot pink!
I spritzed the whole page with water,
then used two colors of Dylusions Ink Sprays.
I sprayed Vibrant Turquoise and Lemon Zest on top
of water and let the colors start running.
Don't worry about that little curving of the paper.
It settles down flat as the inks dry.
 Then I sprayed more water and tilted the sketchbook
from side to side, and back and forth
to get the colors mixing and covering the page.
One trick I've learned is this: 
where you have little specks of color, little dots that
spray out to the sides of your color shot,
spritz some water onto those blank areas
and you will be surprised how much color is actually
there that you don't really see with the eye.
This will give you some lighter areas of color.
And wherever you have too much color, or the color is too dark, 
or you are starting to get concerned about mud,
blot it with a paper towel and lift some of that color.
I keep a roll on my work table.
Actually I buy the pack of 12 rolls from Wal-Mart when they are on sale.
 This is what I ended up with. 
Remember I just used two colors on this page,
yet I see yellows, blue, turquoise, a darker blue,
pale green, spring green, and darker green -
all from the two colors I started with.
I love Dylusions Ink Sprays!
 An important thing to remember is these colors are not watersafe. If you use wet media on top of this page, the colors may very well start moving and blending again. As long as you remember this, you can work with it. It really isn't that big a problem.
To start building my page, I used two stamps strategically placed.
Hahaha! What was my strategy? 
I had no idea. I just like these two particular stamps.
 Then I set the sketchbook aside for a couple months while I worked on other things. Two nights ago I picked it back up and added these tangles. Just look for pops of colors, sections, blobs, areas, whatever you want to call them and add tangles in those sections. I started with the larger circles - the Frankles calls them balls - and made three sections with those. Fleurette, cruffle, kuke, and my own matahari. Then I added some bubbles, tipple, and printemps around them.
Last night I kept adding in those sections of primtemps, bubbles, and tipple,
connecting them to the three sections of balls, tieing all those sections together.
I even added a free-floating section over the butterfly.
Did a little shading and I'm done.
Super easy piece to make,
the colors are awesome,
and I'm happy with it!
A nice mixed media looking piece created with ink spray and a Sharpie fine point.
Just those two things.
Nice spring colors make me smile!
And you can so totally do this yourself!

Thursday, February 19, 2015

Garlic and Joey

I've been playing with this shape a lot lately.
(I'm so cold I'm having trouble typing.
Back space, correct, go forward, repeat.)
Playing with different ways to fill this shape -
that totally looks like a bulb of garlic to me,
for some reason.
That background is a 5" x 7" pull from a gelli plate.
Joey's Challenge this week was called 
The Polka Dot Tangle.
Randomly drawn circles, 
each filled with a different tangle.
It's really good practice for quick tangles.
For this 5" x 7" piece, I used my new 
Prima Color Bloom Spray Mists.
I've used them before and my pens worked great over the color, but for some reason this time
my pens did not work so great. 
I used a sharpie fine point and had
trouble filling in the dark areas.
I tried shading, but the color wouldn't hold
the graphite. So. Here it is.
Unshaded but that's ok.
To participate in Joey's Challenge,
just go here and check it out. 

Saturday, December 6, 2014

ING Disney Style

I spent the better part of the past week in Orlando, hoteling on the Disney complex, drawing, painting, relaxing, and doing a little shopping.

I love going to Downtown Disney. Not so much this trip however. They are in the process of "reimagining" Downtown Disney and it is one serious mess. Little parking, lots of construction walls, a ton of people in very little space, not at all a pleasant shopping experience. 

They funneled us into a partially built parking garage that is going to be gargantuan - and just what Downtown Disney needs when it's completed - and we got to hunt and seek for a parking space down aisles that had no exits or turnarounds at the end, with cars backed up behind you. Not zen-like at all.

Once I found a space I got to hike my way in to the shopping district via a long sidewalk under a bunch of scaffolding and construction by-product. 

Well, that brings me to today's post. ING. It's a new tangle from the Zentangle® folks, created by Molly Hollibaugh. She deconstructed it from - - - scaffolding! 

My tile reminds me of the Disney scaffolding and all the bits of debris and concrete that I got to step over and walk around to get into the Downtown Disney area that I did not go back and visit again while I was in Orlando. Oh well, at least the tile was fun to draw! 

Thursday, November 27, 2014

Happy Thanksgiving

Happy Thanksgiving!

So much to be thankful for,
so many blessings in my life.
So many ways to thank God,
so many things I take for granted.

May God richly bless you and yours
in this next year,
as we all take time to just say
Thanks!

Tuesday, November 18, 2014

The Eyes Have It - Joey's #33 Tangle a Mandala

There's a cool blog that posts a weekly tangle challenge. Made By Joey has something for every level of tangler. I don't always get my artwork posted on Joey's blog but I always try to complete the challenge. This eye mandala was drawn for her 33rd weekly challenge. I got it finished after the next week was already posted and am just now getting around to linking it in.

This is a free-hand mandala that I worked on while I watched Merlin on Netflix. I don't know if that is where the 'eyes' came from or not. Morgana was being her usual creepy-deepy self, so it is entirely possible. Haha!

Also, I haven't shaded the mandala yet because I am hoping to add some spiffy color to it. But of course!

If you would like to check out Joey's weekly challenge just click on the pink link with her name at the start of this post. This week's challenge is to tangle something quilted. I am going to be all over this one!

Wednesday, October 1, 2014

I Can Draw That With My Eyes Shut Tight!

Draw with your eyes shut?
Strange question?
Perhaps, but that is exactly what the Diva
asked us to do this week in her
The Diva Challenge.
I always love this challenge.
I've gotten away from using a string when I tangle.
I like the freeness that comes from not using a string.
But sometimes we just need to go back to our roots.
Back to where it all began and start over.
That is what Laura asked us to do in this week's
Diva Challenge

I took a 3 1/2" zentangle tile and used a pencil
to lay down a dot in each corner,
then connected the dots with lines
forming a box.
With my eyes open :).

Then I closed my eyes,
kept one hand on the tile so I would know where it was,
and I drew a string.
I like loopy-di-loops, so it kind of
went in that direction.

Then I opened my eyes and went
whoa! not such a great string!
But I had decided beforehand
that I would go wherever my blind string
took me . . .
. . . and this is what I drew.
I am forcing myself to leave some white space
(negative space)
in my tangling lately. 
And also lately - I am having trouble remembering
what tangles I actually know.
I have 4 or 5 basic ones that I use all the time.
Talk about being stuck in a rut.
So, I have started working on something
that I learned from Cherryl Moote that I
will share with you soon. 
An ongoing work in progress.
Coming soon.

For now, head on over to the Diva's page here
and check out all the blind string offerings.
You could even close your eyes and try your
hand at a blind string. 
I'd love to see how it turns out!

The Creator's Leaf

Monday, September 29, 2014

When Is Enough - Enough?

Sometimes I have the tendency to overdo things. To take things one step too far. It is hard to know when to stop. So, how do you know when enough is just that - enough? In the drawing above you see a lot of negative space. Some people call it white space, except in this case it would  be green, yellow, and blue space. Hehehe!
Let me walk you through what I did here. I started with a scrap of watercolor paper - about 4" x 6". (I'm too tired to actually get up and go look for a ruler. Sorry.) I made a watercolor background with my Dylusions Ink Sprays - lemon zest and london blue. Then I made some ghosted dots with a stencil and some water. I liked the gridwork look of the dots, so I started with those and began filling in some of the dots with printemps.
I just kept adding them where it seemed appropriate. Then I added double lines - making the resemblance to tinker toys kind of the thing here. When I felt like I had "enough", I stopped. Notice that it does not cover the entire block. Not even a whole corner. I filled in a section that was irregular in shape, to give a comfortable feel to the page so far, then I left it at that and moved on.
I added some clusters of printemps out near three of the corners. Similar in origin to my tinker toys, but really quite different in appearance. Next I added some clusters of holes. A little here and there. Not overwhelming the page, just a highlight - so to speak.
I wanted to keep the number of tangles to a minimum. I am liking that whole minimalistic approach lately and you can really see it here. I connected some of the areas with tipple - those little, tiny circles. You can really do amazing things with tipple. Notice how they draw your eye into different portions of the drawing. 

I considered stopping at that point, but felt the drawing needed a bit more. So, I added more printemps in that upper right corner, as well as a segment of them in the lower right. 

It still needed a bit more, so I filled in some of the tinker toys with cheesecloth - which looks pretty much like screen! I love using it and it is such a forgiving tangle to draw. A white gelly roll pen added some highlights.

Then I stopped and looked. I left the drawing until the next day, and again looked and analyzed. The drawing felt complete to me, like it was e n o u g h. So, I stopped. Fun tangles, lovely negative space, and some warm, inviting color. When your drawing speaks to you and you are happy with it - that is when you know that enough is enough.

Sunday, September 7, 2014

Quib - Square One

A couple posts back I mentioned a facebook group I am a member of. It's called Square One: Purely Zentangle. The focus of the group is to go back to square one and enjoy the beauty of true zentangle. 

This week Square One is challenging us to use the tangle quib. You can see the step out here. Quib is not a personal favorite, but it is interesting to draw. I filled my quib with tipple, a staple tangle for me. 

Why don't you give quib a try - then you can post your work on the facebook group Square One: Purely Zentangle. It's a good practice - returning to your roots. 
The Creator's Leaf

Friday, July 11, 2014

Star Unraveled

 This is what I've been playing with lately. Not an idea that I came up with, but based on a piece of artwork created by my friend and fellow CZT - artist Sharon Payne . . .
. . . that I saw and loved! Sharon calls this piece Dreaming at Sunset. You can see this - and more of Sharon's beautiful art - on her blog Jazztangled. I was really drawn to the leaf shapes and the little pieces dangling and swirling out the ends of them. 
So I picked up a pen and a sheet of 9" x 12" bristol smooth surface and started drawing. I sat in my chair and drew for two hours. That is pretty intense for me. I can play with paints and inks for two hours, but drawing for two hours is a completely different story. I toyed with the idea of the almond shapes with the tendrils flowing out the ends. And somehow they ended up in a star-ish shape - I think someone else may have drawn them in this shape first, but I couldn't remember who. (So, sorry if I miss giving credit to someone for the idea.) I love all the loops, and swirls, and curls, and furls. Kind of like a star just unraveling and spilling everything right out there.
Then I moved on to a smaller version. I had some scraps leftover from a book project - with dylusions ink spray colors already on them - and I used one of those. This piece is about 4" squared. There are a couple background pieces on the right that you haven't seen yet. I'm still working on those.
And of course I had to play around some with the settings on my iPad when I took this picture. This filter is called process. Apparently some rocket scientist named the filters. Who knew. 
Anyhoo, here she is - Star Unraveled - in all her beautiful, bright, wild and crazy unedited color! Keep in mind she's about 4 inches across and compare that with the size you see on your computer screen and you'll know about how big this piece truly is. And please go check out Sharon's blog here. You'll love visiting her! (And just read her posts with a soft, southern drawl and y'all will feel right at home.) (And I can say that cause I'm from the south, too!)

New in my studio? A brand new product from Zentangle.com that we will be releasing to the public in a couple weeks. Until then I get to play with it all by myself - bwahahahaha! 

The Creator's Leaf

Sunday, July 6, 2014

TootsieMoon and Color

 Last week I posted the step-out for my tangle TootsieMoon and gave some examples of it in use. Below is the tile in straight black and white. I have since come back and added color by way of Prismacolor Pencils. And I added that cute little snail. He (or she) is fresh from CZT training in Rhode Island and will begin popping up all over the zentangle pages you follow very soon. Meet Bijou.
As much as I love the color - it's hard to beat the plain ol' black and white version.
If you haven't tried out TootsieMoon yet, here is a link to the step out. Have fun!

The Creator's Leaf

Tuesday, July 1, 2014

One More TootsieMoon

As promised, one more tile featuring TootsieMoon. You've seen it straight, you've seen it round, and now you see it meandering. In case you didn't see the step-out for TootsieMoon, scroll down to the next post and you can see step by step how to draw it out. How to tangle a little TootsieMoon for yourself. And once again - no shading on this piece yet, because I want to color it first. Maybe. Not sure. I'm kind of liking it just like this. So maybe a little shading to come. Hahaha!

Today I also finally did some cutting on a couple sheets of handmade Japanese paper that I bought in Toronto a short time ago. I was really nervous about that - but everything turned out great. I took photos and I hope that will be a post for tomorrow. In the meantime - have fun with TootsieMoon!
The Creator's Leaf

Sunday, June 29, 2014

Floral Color

Recently, I posted the black and white version of this tile as part of a weekly challenge. You can see the post here.
This is what I started with. Some fescu, some mooka,  some sunz, some printemps, some tipple, and some flora. All tangle patterns with a bunch of aura-ing. Then today I added color with Grumbacher transparent watercolor pans and some Derwent Inktense watercolor pencils. Highlights came from a white gelly roll pen. 
Lots of fun and super easy to draw! Soon I will provide a step-out for flora. Hopefully :). Have a great week!
The Creator's Leaf