
Showing posts with label bubbles. Show all posts

Friday, March 27, 2015

Spring Colors With the Steps

I started this piece a few months back
and am just now getting back to it.
Let me walk you through the making of it.
One night I had a short window of time to work with,
so I decided to set up a few backgrounds to tangle
on later. 
I really, really love everything I know about
Stillman & Birn.
Their sketchbooks are wonderful!
Heavyweight pages, smooth surfaces, a sturdy cover,
and they come in a range of styles.
My favorite is the Zeta Series.
180 lb. paper, smooth surface, natural white.
Does well with a lot of water/wet media.
 So I used my Zeta series 6" x 8" sketchbook.
I began by placing paper under the page to
keep any wet/color from bleeding/running
onto the next page.
Good thing, too, because I decided to make the next page hot pink!
I spritzed the whole page with water,
then used two colors of Dylusions Ink Sprays.
I sprayed Vibrant Turquoise and Lemon Zest on top
of water and let the colors start running.
Don't worry about that little curving of the paper.
It settles down flat as the inks dry.
 Then I sprayed more water and tilted the sketchbook
from side to side, and back and forth
to get the colors mixing and covering the page.
One trick I've learned is this: 
where you have little specks of color, little dots that
spray out to the sides of your color shot,
spritz some water onto those blank areas
and you will be surprised how much color is actually
there that you don't really see with the eye.
This will give you some lighter areas of color.
And wherever you have too much color, or the color is too dark, 
or you are starting to get concerned about mud,
blot it with a paper towel and lift some of that color.
I keep a roll on my work table.
Actually I buy the pack of 12 rolls from Wal-Mart when they are on sale.
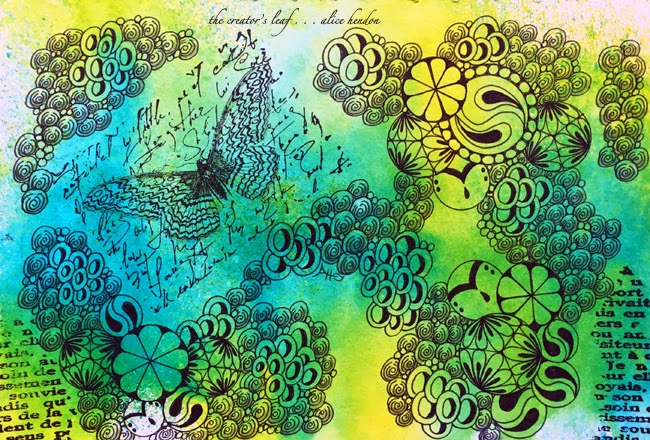
 This is what I ended up with. 
Remember I just used two colors on this page,
yet I see yellows, blue, turquoise, a darker blue,
pale green, spring green, and darker green -
all from the two colors I started with.
I love Dylusions Ink Sprays!
 An important thing to remember is these colors are not watersafe. If you use wet media on top of this page, the colors may very well start moving and blending again. As long as you remember this, you can work with it. It really isn't that big a problem.
To start building my page, I used two stamps strategically placed.
Hahaha! What was my strategy? 
I had no idea. I just like these two particular stamps.
 Then I set the sketchbook aside for a couple months while I worked on other things. Two nights ago I picked it back up and added these tangles. Just look for pops of colors, sections, blobs, areas, whatever you want to call them and add tangles in those sections. I started with the larger circles - the Frankles calls them balls - and made three sections with those. Fleurette, cruffle, kuke, and my own matahari. Then I added some bubbles, tipple, and printemps around them.
Last night I kept adding in those sections of primtemps, bubbles, and tipple,
connecting them to the three sections of balls, tieing all those sections together.
I even added a free-floating section over the butterfly.
Did a little shading and I'm done.
Super easy piece to make,
the colors are awesome,
and I'm happy with it!
A nice mixed media looking piece created with ink spray and a Sharpie fine point.
Just those two things.
Nice spring colors make me smile!
And you can so totally do this yourself!

Tuesday, May 20, 2014

Round and Round and Round

Round and round and round I go. Running in circles. Getting nothing accomplished. It has been one of those days. Actually, I spent most of the day with my mom - going to the dentist, hanging out, feeling frustrated because she can not hear most of what I say, but feeling blessed that I still have my mom here. It has been a very frustrating day. This little nothing drawing seems to exemplify what my day has been like. Ugh. Tomorrow promises to be better. Our sweet little Frankie Bear will be staying with us for a couple days while her mom and dad work and sleep. Yay!!! I can not wait!!! I love me some Frankie Bear!!! 

The Creator's Leaf

Monday, March 31, 2014

Trip to Paradise

My life just doesn't seem to slow down. I thought when I retired that life would be easier, that I wouldn't feel pulled in so many directions. Boy! was I wrong! I seriously need to learn the meaning of the word 'no' and start using it occasionally. Actually last night I did send an email to a friend who runs an ATC swap  through facebook and asked to be left out of the next swap. I have too many irons in the fire.
I just got back home last night from visiting up north. On Thursday I head south to a zentangle retreat at Paradise Beach. I can not wait! One of the fun things Jo-Ellen arranged for us to participate in is an ensemble tile swap. What you see above are the straight lined ensemble and the curved line ensemble that Zentangle® carries. I sell them in my Etsy store :). There are nine tiles in each ensemble with a running string throughout the nine. For this swap we were instructed to tangle each tile independently - that would be why they look a little strange next to each other. When we come home from Paradise, we will have 18 new tiles - from 18 of our fellow artists. Pretty amazing! And what a great way to collect artwork from other tangle artists! Retreat to Paradise? Here I come! (After I wash clothes, pack, find my supply lists and probably make a trip to Michael's, repack because I will have forgotten something. . . well, you get the idea ;) )

The Creator's Leaf

Wednesday, March 19, 2014

A Nighttime's Drawing, APR #97

I'm back in Maryland spending some time with Kali. I drew this after supper a few nights ago, in my Stillman & Birn Zeta Series sketchbook. The color comes from bubblegum pink and lemon zest  Dylusions Ink Sprays with some spritzed water. Lots of liquid. How did the Zeta Series hold up? Fantastic! No warping at all, just lots of gorgeous, brilliant color! Add a little sharpie in black and you have a fun piece of art.
just add water silly's blog hop link
I'm linking this up to the Artist's Play Room post for the week. You can check it out by clicking on the APR box.

The Creator's Leaf

Friday, March 7, 2014

Confused About Twinchies?

There are still several sets of twinchies I want to share with you. Fifty-four of us are swapping these little two-inch pieces of art and - as you can well imagine - it is hard to make a little two inch piece of paper become spectacular. You don't have a whole lot of room to work with in two inches. (There are a whole world of people who make inchies - I couldn't even imagine. Haha! Good for them, I say!)
So. Where did I start? 

Where do I many times start? 

I can hear Nancy Wigley chiming in here - I start with Dylusions Ink Sprays.
 
Yes, I do know there is other product on the market but why go there when I get these bright, luscious, beautiful colors with Dylusions? Seriously. 

When I am working on projects I save any scraps of paper in a ziploc bag and add to it as I go. There is always a scrap bag on my work table. (It's usually buried, but it's there.) Twinchies are a great way to use up some of that scrap. Some of the pieces I used already had color on them. (I don't waste scraps with pretty color on them. I horde, uh, save them.) For the ones that didn't - I spritzed water onto the pieces, followed by spritzes of a couple different colors of dylusions. Then you just let it all sit for about 10-15 seconds and watch those colors blend. A paper towel blotted to the paper surface will stop that mixing/blending action.
Remember - if your color is too dark when it is dry or almost dry - you can lighten it up with another spritz of water. Dylusions are not color fast. They will start reacting again when you add 'wet' product - be that water or another color. 

You will notice some of the tiles above have designs on them. Take your dry colored tile, lay a stencil over the top, hold it in place, and spritz water over the top of the stencil. Let it sit for 5-10 seconds, then carefully lift the stencil and watch the color lifting start to work. After about 15 more seconds, blot the tile with a paper towel - and continue to watch that color lift leaving behind the design of whatever stencil you used. Remember - dylusions inks are not water fast, they react with wet product. So take advantage of that and make it work to your benefit.
Since I am a tangler - I went back and added various tangle patterns to the tiles. Some are more elaborate than others. This wasn't one of them :). I loved the little fish and how well he turned out. (He came from a stencil.) I went simpler and just added tangle bubbles to his water, leaving the fish to be the focus of this twinchie. There are so many things you can do! So - save your scraps (or hack up a big sheet and have fun!) and get to making some twinchie awesomeness! Cause it's fun!

Saturday, March 1, 2014

Twinchies Under the Sea

Under the Sea
~ The Little Mermaid ~

The seaweed is always greener
in somebody else's lake.
You dream about going up there,
but that is a big mistake.
Just look at the world around you,
right here on the ocean floor.
Such wonderful things surround you.
What more is you lookin' for?

Under the sea,
Under the sea,
Darling, it's better
down where it's wetter,
take it from me.
Up on the shore they work all day.
Out in the sun they slave away,
while we devotin'
full time to floatin'
under the sea.

Twinchies are tiny pieces of art that are two inches square. A whole bunch of artists on facebook are currently involved in a twinchie swap. I can not wait to start receiving beautiful pieces of art from all over the world - literally! These are just a few of the twinchies I will be sending out. More tomorrow.

These twinchies were made on watercolor Bristol smooth from Strathmore, color comes from Dylusions Ink Sprays, and sparklies are courtesy of Wink of Stella Glitter Markers and At You Spica Pens. Click on photo to see a larger view.

The Creator's Leaf